Arduino. Il Game Boy, l’idolo dei ragazzini degli anni ’80 e ’90, la prima sorta di console tascabile. Ore e ore passate a consumarlo. C’è qualcuno che, ancora nostalgico dei vecchi ricordi, ha deciso di utilizzare Arduino per creare un Game Boy Open source. In realtà il dispositivo è leggermente più piccolo di un Game Boy, ma è particolarmente interessante perché utilizza Arduino come core.
Il progetto Arduino prevede la realizzazione di un Game Boy open source
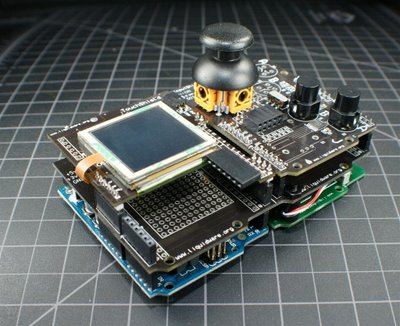
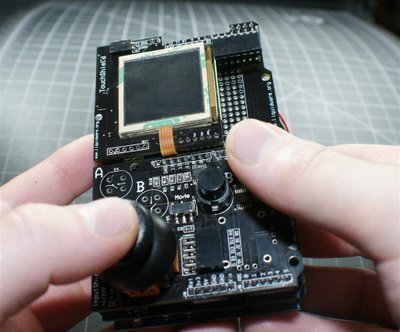
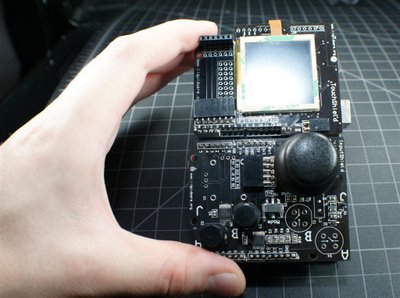
Di seguito vengono mostrate alcune foto del Gamepack.
Il video successivo mostra invece il risultato ottenuto una volta che tutto è stato sistemato e pronto ad essere eseguito; il codice sorgente che gira su Arduino è quello che vedete riportato dopo il video.
#include
#define RXPIN 3
#define TXPIN 2
AFSoftSerial mySerial = AFSoftSerial(RXPIN, TXPIN);
unsigned char x=0;
void setup()
{
mySerial.begin(9600);

/* Sync up by waiting for character */
while(mySerial.read() != 'U');
}

void loop()
{
/* The first analog pin sent */
x=0;

/* send 6 Analog Pin values */
while (x <>
{
serial_sendAnalog(x);
x++;
}
delay(10);
x=0;
while(x<>
{
serial_sendDigital(x);
x++;
}
delay(100);
}
void serial_sendDigital(unsigned char digitalPin)
{

if ( (digitalPin <> 13) )
return;

mySerial.print((unsigned char)digitalRead(digitalPin));
delay(2);

}

void serial_sendAnalog(unsigned char analogPin)
{
unsigned char lowByte, highByte;
unsigned int val;

/* Pin number range check */
if (analogPin > 6)
return;

/* Get the value */
val = analogRead(analogPin);

/* Separate the value into 2 bytes */
lowByte = (unsigned char)val;
highByte = (unsigned char)(val >> 8);

/* Send the high byte */
mySerial.print(highByte);

/* Write delay */
delay(1);

/* Send the low byte */
mySerial.print(lowByte);

/* Write delay */
delay(1);
}
E questa è la parte che gira suTouchShield:
COLOR green = { 0, 255, 0 };
COLOR blue = {0,0,255};
COLOR yellow = {255,255,0};
COLOR black = {0,0,0};
COLOR white = {255,255,255};
COLOR grey = {0x77,0x77,0x77};
COLOR red = {255,0,0};
POINT my_point;
unsigned int analogValues[6];
unsigned char digitalValues[10];
LCD_RECT digitalRect = { 118, 15, 127, 115 };
LCD_RECT analogRect = {0, 60, 32, 121 };
unsigned char x;
void setup()
{
Serial.begin(9600);
delay(3000);
/* The sync character */
Serial.print('U');
}
unsigned int oldx, oldy, newx, newy;
int erasemode = 2;
int pencolor = 1;

void loop()
{
//digitalValues[0] - digital pin 4, button A MODEA
//digitalValues[1] - digital pin 5, button B MODEA
//digitalValues[4] - digital pin 8, button A MODEB
//digitalValues[5] - digital pin 9, button B MODEB
//analogValues[5] - joystick y, MODEA
//analogValues[4] - joystick x, MODEA
//analogValues[3] - joystick y, MODEB
//analogValues[2] - joystick x, MODEB

//Read analog values
analogValues[0] = (Serial.read() <
<>
analogValues[1] = (Serial.read() <
<>
analogValues[2] = (Serial.read() <
<>
analogValues[3] = (Serial.read() <
<>
analogValues[4] = (Serial.read() <
<>
analogValues[5] = (Serial.read() <
<>
//Read digital values:
//Read digital values
digitalValues[0] = Serial.read();
digitalValues[1] = Serial.read();
digitalValues[2] = Serial.read();
digitalValues[3] = Serial.read();
digitalValues[4] = Serial.read();
digitalValues[5] = Serial.read();
digitalValues[6] = Serial.read();
digitalValues[7] = Serial.read();
digitalValues[8] = Serial.read();
digitalValues[9] = Serial.read();

if (touch_get_cursor(&my_point)) {
lcd_clearScreen( black);
}

newx=3+(1023-analogValues[5])*.12;
newy=3+(1023-analogValues[4])*.12;

if (erasemode && ((oldx != newx) (oldy != newy))) {
lcd_circle(oldx,oldy,5, black, black);
}
if (pencolor == 1) {
lcd_circle(newx,newy,5, blue, blue);
} else if (pencolor == 2) {
lcd_circle(newx,newy,5, green, green);
} else if (pencolor == 3) {
lcd_circle(newx,newy,5, red, red);
} else {
lcd_circle(newx,newy,5, white, white);
}

if (!digitalValues[0]) {
erasemode = !erasemode;
}

if (!digitalValues[1]) {
pencolor++;
if (pencolor == 5) {
pencolor = 1;
}
}

oldx=newx;
oldy=newy;
}
La scheda Arduino disponibile da Farnell
Di questo progetto sono interessanti le shield di input e output interfacciabili con Arduino. Sono infatti progettate in modo tale da potersi connettere tra di loro in maniera molto semplice e secondo la forma stilistica che si vuole conferire alla composizione finale (hanno più attacchi in modo da poter essere montate in orizzontale o verticale). Con le stesse board, un pò di tempo fa, abbiamo visto realizzata la ‘PSP’ open source, sempre con core Arduino. I gradi di libertà di utilizzo della scheda Arduino sono già di per se tanti, le shield di contorno contribuiscono ad estendere le possibili funzionalità di un prodotto finito. In pratica si tratta di una combinazione vincente sempre in forte crescita e tutto questo grazie alla licenza open source sotto la quale sono rilasciati sia Arduino che le shield.
sarebbe un bel progetto da portare avanti
Il joystick usato nella piattaforma e’ formato da un doppio potenziometro, uno utilizzato per l’asse X e uno per l’asse Y, in questo modo si comporta come un joystick analogico di quelli utilizzati sui JoyPad della PS2 o dell’ Xbox. Contiene anche un piccolo pulsantino in modo da usarlo premendo il joystick. Al micro bastera’ gestire solo due pin della direzione ( collegati ai suoi ingressi analogici) e uno per la pressione del pulsante (collegato a un input pin digitale).
Incredibile cosa ci si riesca a fare con Arduino!
La shield con i joystick e il display è molto interessante ed anche il resto dell’hardware promette bene… unico problema: potrà un processore così poco potente a far girare dei giochi in modo decente?
Speriamo che almeno gli “arcade” (snake, pong, muretto…) riescano a funzionare bene… l’importante è scrivere codice compatto!
Uaaa! Ho appena visto sulla home del progetto che ci hanno fatto girare perfino Tetris!
Peccato che gli sketch già sviluppati non li trovo online! Se un giorno mi deciderò a pubblicare un sito su Arduino, mi concentrerò anche su questa nuova console!